Tuesday, 12 February 2013

Creating Subtle Shadows with New Copic Markers

As the same as last year, I am trying to keep up with my personal development work. Here are some drawings I did for Life drawing which I try to attend every week. Looking back now at the drawings I have, I can see that I am improving my general skills and feel a lot more confident that I am able to draw anything I set out to draw. I remember in the past, I always found it to be a struggle to actually develop and establish a certain style, although looking at my drawings bellow, I feel that I finally have an art style, which is based on using thin lines and soft tones to establish the image.

I recently bought a set of grey scale COPIC markers which have been a great help in establishing a deeper and eye catching image. It really makes the image pop off of the page and really adds more interest to the image. I found it amazing how such a simple addition to the page could create such meaningful results.

The above image was a 15 Minute sketch of another sketch in the life drawing room which displays 3 figures which were expressed so well and their dynamic poses with minimal line-work which I thought worked really well.

The above image was of the model Olympia which I felt I was really happy with, it was a 15 minute pose but I really felt that I captured her anatomy correctly and it really has some life within it. 

 The above sketch was a 15 minute sketch of the model in a very interesting and challenging position, although somehow it turned out really well and I was really happy with the final results. The subtle lines that were drawn and the overall composition and use of colour made this turn out quite strikingly.    
The image above was of the model standing up and was another 15 minute pose. I was happy with the way this one turned out and the dark grey shading of the hair turned out really well and brought more depth to the image.


The image bellow was a quick sketch of the lecture environment and the first proper time I used the COPIC marker pens and they really do bring great results and I plan to use them as a congruent theme throughout this year's sketchbook.

Monday, 11 February 2013

Supervisor Meeting 2

I had my 2nd supervisor meeting with Dayna, this week there wasn't as much to discuss as we discussed a lot of things in depth the previous week, although the project is coming along fairly well. We discussed that it would be nice for him to see some of the systemic progress of the project and he wanted to see the development of the game so if I had any issues I could ask academics for assistance.

Here is what we discussed in detail:


Meeting Agenda:

·        The 2nd meeting to discuss the week’s progress.
·        Discussing relevant research to assist in the project.
·        Discuss the approach to tacking the dissertation.


Progress Report:

·        Some more in depth research that is relevant to the dissertation was done.
·        Started to learn Unity 3.5 which will be used to create the final project.
·        Did a few hours of life drawing in sketchbook.
·        Created more in-depth sketches of game concept.


Agreed action points:

·        Show some of the game in Unity for the next meeting.
·        Start drafting the dissertation out, even just the introduction.
·        Show some of the new research and discuss it next week.
·        Discuss your programing issues with Grant.

Saturday, 9 February 2013

Getting Technical with Unity

Personal Development 

From Corona SDK, to Adobe Flash and now onto Unity3D. Some would say that using 3 different gaming engines is a risky thing to do to create a final project prototype within 8 months. I would have to agree, although I also see a different perspective in which I have personally gained so much by trying all three engines and slowly but surely beginning to understand the other side, namely, programming/coding. I started this semester with little Unity3D experience and being an artist with no programming experience before this project, I feel I have struggled and hit many walls so far, although at the same time learnt so much.

Corona SDK used a programming language called Lua, which was very simple to use for beginners and was quite appropriate for me, Adobe Flash used actionscipt which was also quite easy to learn. Unity uses a combination of Javascipt and C# as well as Boo Script, all of which are particularly used for 3D gaming within the industry and are of a high level. Some might also say that programming a 2D game in a 3D engine is an unnecessary hassle, I would also agree with that to a certain extent, although after a lot of extensive research on games that were developed and had systemic and aesthetic value. I came to find that certain games such as Thomas was Alone was created in Unity by a single developer, and the feel and visuals that were so clean and crisp in Unity, but most importantly the support from the community sealed the deal.

Learning JavaScript within Unity 

Just like learning a new spoken language, learning a new coding language is the same, there is a steep learning curve before you can speak or in coding, before you can actually code something yourself. Luckily, there is what seems like an infinite resource of tutorials and videos online to help when you are in need of some direction or forums and helpful professional and hobbyist who are willing to lend a helping hand. 

To start with, there is a useful tutorial online called 'Introduction to scripting with Unity', which was exactly what i was needing in order to get kick started with Unity as the bottom line is with any gaming software is that it's preferable if you know how to code, or if not that, at least understand how it works. This can also be related with learning a new spoken language, when you are in a different country (gaming engine), to get around, it is good to know some of that native spoken language (coding language for software) and if not, it is always good to be able to understand even a little bit (dictionary on hand, the basics: hello, good bye, where is the toilet).
The tutorial starts off by suggesting the aim and the requirements to fulfill the tutorial, along with a table of contents. This often reminds me that the structure of academic articles or written papers are implemented in a wide range of publications including this one, books, magazines, reports of all kinds and the writing structure you learn at university is essential in many fields of life. 

The main bulk of the tutorial teaches you the basics of getting familiar with Unity, meaning  getting used to the interface, particularly with the camera and also creating game objects such as the cube above. The tutorial also goes over a simple produced script to try and click and move the object. 

It also goes through what naming conventions are within coding which are the basics that every coder needs to learn. 

Variables: are things that you can choose or edit, such as a number or adding sounds, materials or other items. 
Functions: create the system of code, you usually call a function before you write out a block of code with specific functions. 
Classes: these create a hierarchy of functions, it's basically a grouping system for functions. 

It also goes over the various names that can replace the Update() function. Each of which has their own purpose when used within coding. A commonly used one that is similar in ActionScript is the OnMouseDown() for a mouse 'click'.

Unity Best Practices

Before starting the project, as with any project, the way you manage and plan what you are going to do within the project are crucial to the success and the speed of the projects completion. After reading several reviews online about people using unity, it was clear to me that for a whole game project, I needed to know certain things about how to keep everything in order and know where things are as well as saving time by knowing the tweaks and tricks.

I then found the following article named "50 tips for working with Unity" which can be found here: http://devmag.org.za/2012/07/12/50-tips-for-working-with-unity-best-practices/

The whole article has an abundance of tips and things you should know before using Unity.

The thing that saved me from a lot of hassle was discovering how prefabs should be used for basically everyting. Let me explain why this is:

Unity Prefab: A unity Prefab is basically a grouped object which can contain any combined properties of any objects and it keeps it as one single group object. For example, if you have a game object that has  a sound playing and a black material, if you create a new prefab and drag that gameobject into the empty prefab, a prefab is created that will hold those properties and can be dragged and dropped into the game without having to recreate the object by slowly add a black material and sound onto a new game object.

The best thing about this is that it can hold everything that a game object has on it, which means you can have a prefab that has all the scripts and all the textures, materials etc etc. and they will all be saved within that prefab that can be easily coped. It is a life saver, and learning how to use this and take advantage of this early on has been a great help.

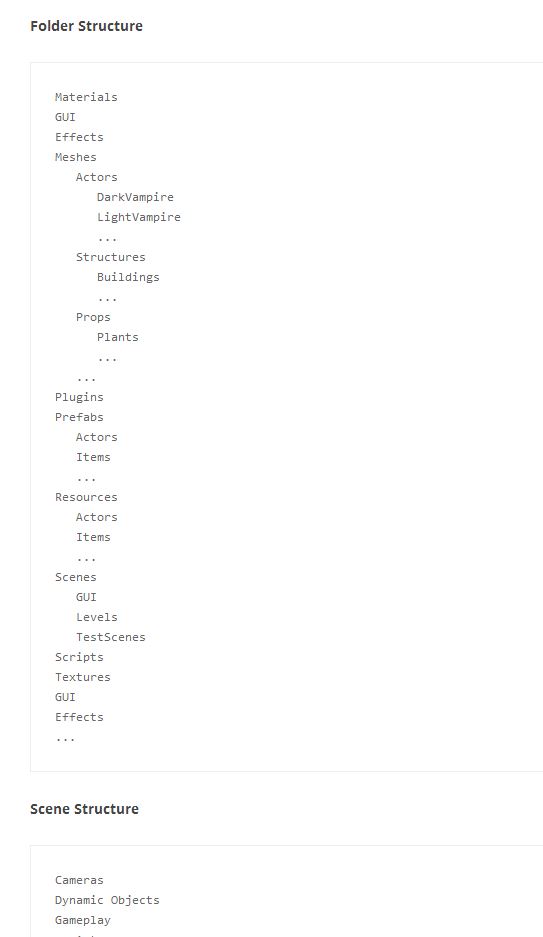
Another tip from the list of 50 that I found helpful was the organisation of folder for your game as this has always been something that I get lost in and find it hard to find my assets now and then, to see how it is meant to be done, brings about a sense of order and makes you realize that although it takes time to organize  a life like this, in the long run it will be worth it, particularly if you are working with others to clarify where certain assets are. 

This has been a great beginning to venturing into Unity and although i notice that I have a long way to go, with practice I feel I can get there and will continue to grow my technical ability.  


Friday, 1 February 2013

Supervisor Meeting 1

I had my first meeting with Dayna to discuss my project on a supervisor basis, I was stressing out about having to produce and show a lot of work, although Dayna calmed me down and said I had already done a lot of work, so that was comforting, although no excuse to stop working.

Here are the things that were discussed:


Meeting Agenda:

·        First meeting to discuss everything about the project so far.
·        To discuss the appropriateness of the project aim and objectives.
·        Show all the work from semester 1 and discuss the next action steps.
·        Prepare the learning contract.
·        Discuss the proposal results and corrections.


Progress Report:

·        The project has a clear direction and it is clear what the next steps are.
·        A prototype of the game has been created early on.
·        There was a great body of work from first semester, now it is about creating the final project and spending time on that.
·        The proposal from last semester was well written and lays a great foundation for the project.
·        The research presented is on an interesting topic which can be of great academic use if applied correctly.


Agreed action points:

·        Create some small actionable goals for the next step/stage of your game.
·        Start drafting the dissertation out, even just the introduction.
·        Start collecting new research which expands on your proposal.
·        Build upon your learning contract for this semester and present it to Dayna.

Life Drawing: Addressing Skill Gaps

Further life drawing personal development. 

These sketches were done to focus on particular skill gaps. 


The hands in particular, many find extremely difficult to draw, I myself find them hard to draw in terms of being believable with no references. 

Why do people struggle so much with hands?

People struggle to draw hands effectively due to their detailed nature and unpredictability. Unpredictable due to there being five fingers which must all be considered in terms of angle, perspective and length. It is hard enough to predict what the perspective of a single object is, so when dealing with five fingers it can get tricky.

My Solution:

My solution to this is to draw the palm of the hand first, then to branch off five fingers as blocks with two pivots within it. This way, if you get the palm right itself, it's just a matter of thinking about how far certain fingers can bend and then deciding what type of hand you are drawing; a soft feminine hand, a strong rough masculine hand etc etc. 


A comparison sketch of the same person, one done in 15 minutes and one done in 5 minutes.

Observational drawing from a  side on angle which I sometimes struggle with, particular with the features of the nose and lips. This was a rather successful attempt. 


An observational drawing of female, this one in particular I was focusing on shading and lighting which I sometimes struggle with, this turned out fairly successful as I created a lot more softer shadows.