Tuesday 30 April 2013

The Real Story

The Reason why Destony is called Des'Tony'

The story of Destony is actually inspired by a friend of mine named Tony who passed away in 2010 in a bus accident. Tony was from France and attended a youth workout to help out as a team leader in Holland. On his way back on the Eurolines bus, the bus crashed and he was the only passenger to pass away from the accident.

Tony Yuen 1989-2010

Tony was one of the most sweet and gentle people you could ever meet. He had a great positive nature about him and always liked to encourage and help people. In the game Destony, the character is based on him, trying to push away the negativity and help people find that glint of hope.

I feel that video game and entertainment and art mediums should not be used only for stimulation and entertainment sake and feel that inspiring, moving and educating people through media is a great concept. Throughout my game Destony, I would somewhat like to influence people to think more about their lives and the situations they face, and try and grab that positive light within their lives whilst they have the opportunity. 

Story Structure

 Every game has a story or a setting, during game development, it starts to become more clear how important it is to structure the game and the events. In Thomas was alone, during development, Mike Bithell created a simple structure for his game which inspired me to keep a similar structure for my game.

In his diagram, he lists all the characters in the game and their abilities and weaknesses or personalities. This creates a clear reference point if there is any confusion in the future.

Thomas was Alone Game Design: Character/Story/Colour/Music Mood

The bottom half of the diagram displays what each story act represents followed by the colour and mood/music that each act represents. This kind of structure is the kind of structure which helps a designer focus more on the aesthetics of a game rather than the quick fix or stimulation. 

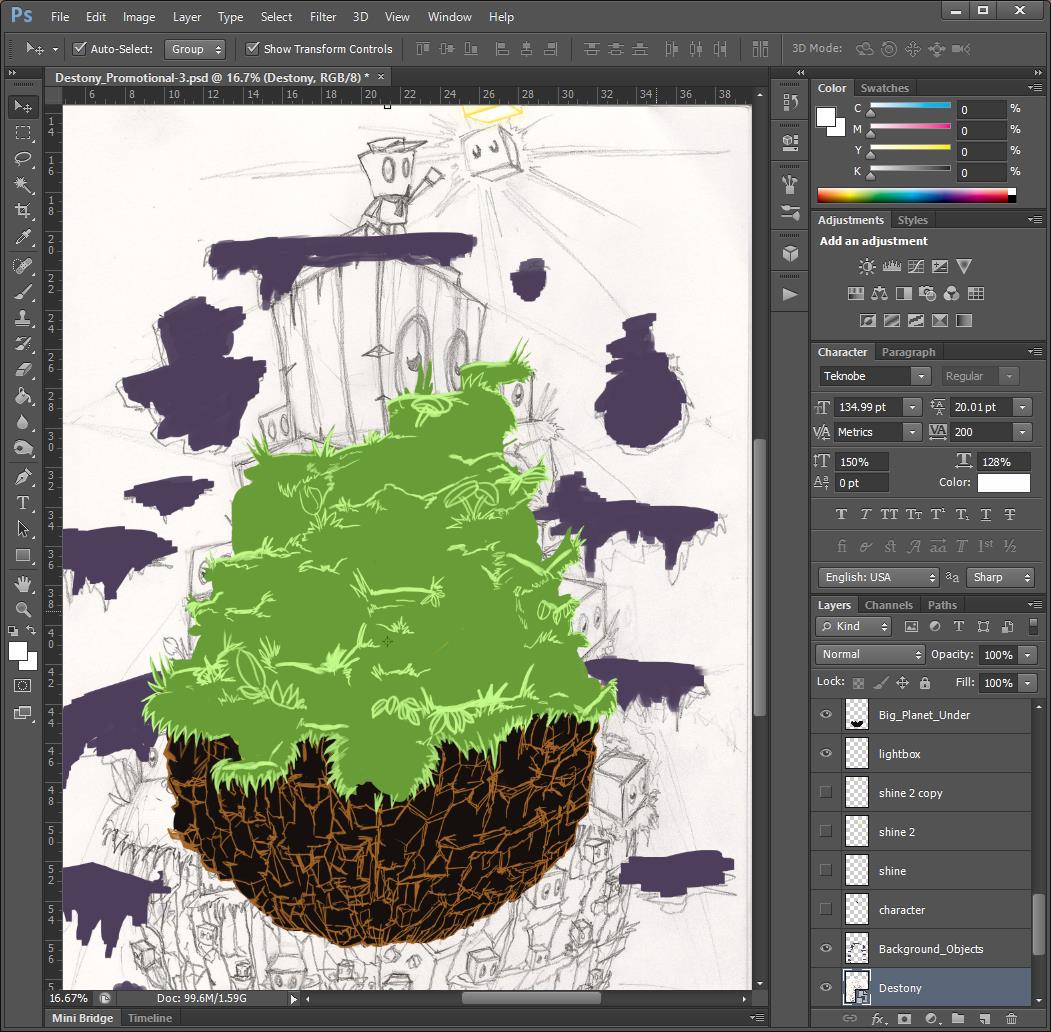
Destony Story Structure

  1. Tony - a gentle hero who jumps his way to helping other see the light and unleash their destiny.
  2. Negative Block - a lazy block filled with negativity.
  3. Light Box - a fragile block with much potential and unharvested energy.

Story


ACT 1
Tony goes into the mind of someone who is struggling with depression at school. As he enters his mind, an alternate expression of his thoughts, he wonders the environment looking for the light blocks. He has to collect 3 positive blocks in order to liberate the person's mind. 

Colour/ Music Mood
  • Warmth
  • Newness
  • Adventure

ACT 2
Tony starts to get the hang of these alternate worlds and catching the light boxes before they fall. Although the levels begin to become more difficult as he has to think fast to save the light boxes. Each level he passes, he enters the mind of someone else. 

Colour/ Music Mood
  • Surprise
  • Shock
  • Overcoming
  • Calm

ACT 3
Tony reaches the final level, this level is different, there is a large negative block with no means to get around it and he has to find the courage to push it out the way. As it often is the case that our fears are nothing but an illusion. Once you push the large block out the way, you are presented with the last light box which moves you to a cut scenes which ends the game. 

Colour/ Music Mood
  • Courage
  • Strength
  • Hope
  • Detiny

Monday 29 April 2013

Honours Project Podcast: Exposing the Exposition

Another podcast, this time, discussing the DO's and DON'TS within a showcase and what my personal as well as research based thoughts are on effectively presenting your work and doing it justice. Find out more bellow:

Podcast: Exposing the Exposition 


Sunday 28 April 2013

Exhibiton Plan Update


The Updated Plan

I have now put a lot more thought into the execution of my showcase as well as thought about the spacing and the sizes of everything. It turns out that an A1 poster is certainly too big and would not be appropriate for my work piece. So I am now going for A2 instead which is a lot more appropriate.

Some major changes are that I have decided to add production work, I have also decided to add paper crafted models of the characters of the game. The promotional blocks on the right will be cubes that stick out of the wall which will give it a very nice 3D look. I have added signs which indicate 'PLAY THE GAME' and 'PLEASE TAKE ONE' which I hope will subliminally influence people to take action. I also plan on using one of the blocks to hold my business cards as well as host my project description. This is the current plan which I am quite happy with although everything is still subject to change during the actual final exposition  especially after seeing my space and how much of the computer gets in the way.


Pros:

  • Much more detail and content specific to the exposition requirements.
  • The new 3D assets will bring a sense of dynamism. 
  • Addition of production work is a great plus for others to see the progress and development of the game.
  • The business cards have a placeholder and object of attention.
  • Included signs for the people who visit for extra clarity.

Cons:

  • It will be fairly expensive to print all the required prints as well as time consuming to create the 3D assets.
  • There may be too much clutter and you may be going against the less is more rule.
  • The work at the bottom has text and may be hard to read.

The Tangible Test

In order for the exhibition to go smoothly, I felt that it wasn't enough to just print things our and hope for the best when it comes to sticking them up on the stands. So I took things into my own hands in creating a 7 foot by 4 foot space. This was done DIY style with a measuring tape and two ties that would be pinned to the top. It has created a great sense of space for me to understand what I am dealing with in a more tangible manner.

The bellow images are a duplication of my design above being put into real use on my bedroom wall. As you can see, they are all placeholder pieces of paper, although the size is fairly accurate to the final exhibition.

The only poster that is not made to size is the Isocronous A3 poster which will be replaced with a large A2 image that will pop out.

Here you can see a close up of how things look. I also made a fake name tag which in the exhibition will be replaced with vinyl text.

Here is another view from the other side and I think that if I manage to post everything as shown here, that the project will prove to be effective as planned. 


Saturday 27 April 2013

Art Design: Developing my Style


As a means of developing my personal art style as well as having something more to show fro the exposition. I decided that a refinement of my previous promotional material was necessary as the main DESTONY logo/text had changed as well as the general feel of the game has become more minimal.

Inspiration

My inspiration for this poster design actually came from this year's Dare to be Digital poster. I felt that the composition and  the use of colours was exactly how I saw Destony in my mind and as a designer I just knew immediately that it was something that connected with my vision. The way that everything is centered and just pops out of the darker background with a subtle gradient, it was a perfect composition which inspired to sketch something out.


In terms of the actual art process, I was very much inspired by Jen Zee: http://jenzee.deviantart.com/

The way she paints her pictures with such vivid colours and a soft brush stroke appearance is a large inspiration and I tried to study her variety of colour and tone within the art I was developing.


The Sketch

After being inspired by the poster above, I spent some time sketching and ended up with the bellow result which was my inspiration to have a more dynamic way of presenting my game concept.

The sketch was done with a 2B pencil on sketchbook paper and took around 2-3 hours roughly.

The next step was to put the image into Photoshop.

After that, I started with blocking out the details of the main objects such as the grass and the rocks. I did this using a rounded paint brush with shape dynamics and transition set to pen pressure with my Wacom tablet.

Blocking out the rocks and experimenting with colour.

The next step was to start shading the grass, this was probably the most time consuming thing ever and I actually learnt a faster way to draw detail and hold the illusion of detail which saved me a lot of time. As half way through after 4-6 hours, I felt like there must be a better way and there way.

I then started to block in the main character which I wanted to be more polished than my previous poster character. To give it more polish and retain my own art style.

The next step was to do the dark block characters, this was probably the most enjoyable, playing around with lighting and using different tones of purple and blue to get a nice polished effect. I also added the shading to the rocks which was far quicker than the grass.

A close up of the detail.

The next step was to start drawing in the flowers and mushrooms, which looks like there was little effort put in although each asset takes at least 15-20 minutes to paint. I had to account the lightning and the shadows also.

I then created the eyes for the blocks using a one set of eyes and duplicating them and changing them throughout to fit the perspective of each block.

The last few steps was to add the blue line of each dark block, this was done by holding SHIFT and clicking from corner to corner to get straight line.

Then next and final stage was playing around with the composition and the effects of the image as well as the background. I also lost the planet debris in the background as I felt it wasn't needed and would distract the focal point of the image.

Here I was playing around with the background and effects as well as the placement of the new logo for the game. This is the new logo which I felt suited the game more and seems far more professional. 

Final Image

 
This was the final result after a lot of thought and re-positioning.

My Thoughts

The final result was far batter than I expected it to look when I first started painting the image, the way the dark blocks pop out and are of high detail and appropriate perspective was a real surprise for me as I began to paint the image. The character and the light box also compliment those features also, and it is clear that the focal point is further up in the image. Starting from the dark bottom of the rocks, all the way up to the Destony title. I spent 3 days non stop painting the image and I feel that the time and effort paid off and there is far less to fault this image in comparison to my other artworks. 

Pros:

  • The colours of the main drawing pop out due to the subtle background.
  • The detail of the grass and other features is far beyond anything I have every produced.
  • It looks like a professional poster that is well polished.
  • The perspective is spot on or close to being so.
  • It is an eye catching piece of work with great use of tonal shading and harmony of colours.
  • There is great complimentary shadows and colour use (purple/yellow, green/red).

Cons:

  • The character is quite small so for some people it might be hard to understand that he is the main protagonist. 
  • The bright light of the light box should maybe cast a stronger light to the rest of the environment.
  • Another version of the background with a more painted look might have also worked well.

Possible Improvements:

  • Nothing that comes to mind, although it would be nice to see what it would look like with more things in the background. Overall, it is certainly my best piece of digital painting so far.


Here is a section I customized and cropped for my business card.

Friday 26 April 2013

Programming Blinking Eyes in Games

What seems simple in visuals is not so simple in programming

During one presentation, my lecturer suggested that having blinking eyes for the negative blocks would bring it to life. I agreed and thought it was a great idea, with little knowledge on how to go about doing it.

One thing that I have started to notice during the development of this game is that as avid gamers, no matter how dedicated they are to playing games will find it difficult to come to fully appreciating the work that is put into developing a game. A great example of this which I must admit to doing, is underestimating the amount of effort that goes into creating a simple thing such as blinking eyes within a game.

Now, being on the other side and actually trying to create this simple function, it is not actually as simple as you'd think. To create blinking eyes, you need to create a custom script (JavaScript) that switches textures with the eyes that are closed every few seconds to create the illusion of blinking eyes. 

This is the original negative block.

After a few moments in photoshop, this is the negative block whilst closing his eyes which will be a single frame animation.

If you animate blinking eyes with more than a 1 frame animation, then it has to be played as a sprite sheet with a custom animation script, so to keep things simple, I am going create a script that alternates between two different textures. I had a lot of help from the Unity3D forums and Unity Answers forum which is plentiful in answers and a large community willing to lend a hand.

The Javascript file can be seen bellow:  

To simply explain the code, the top part of the code starting with 'var' display the variables which are the settings that can be changed. The code bellow the var options are basically the code that creates the variables. So for example, at the top it shows eyeTimer + Random.value*randomfactor, which means that the eyeTimer variable will blink after the allocated second count, but also that at random (random factor) the blinks will happen unexpectedly.

Above you can see what the script looks like within Unity.

Normal Eyes: texture of the normal open eyes.
Blinky Eyes: texture of the closed eyes.
Eye Material: The material that unity connects with (this is particularly for lighting, although there is limited lighting within my game)
Eye Timer: the amount of seconds before a texture change (blink) occurs.
Blink Timer: the time the texture stays before it is changed (the actual blink time)
Random Factor: how much you want a random blinking factor to influence the blink. 

The next step was to make sure that all the blocks do not blink at the same time, as that would look strange, so I had to create 3 separate prefabs (Unity's custom holder of items) of the negative block which would blink all at different times. I chose for block 1 to blink after 3 seconds, block 2 at 4 seconds and block 3 at 5 seconds.

Application


UPDATE: Above is a video of the blinking in action, it sometimes blinks too much in random which I will need to look into fixing, although it is not a massive issue and I think that it brings a sense of atmosphere and realism for what a 2D game can produce. I also applied the same procedure to the white block also. I tried to create a similar code to apply to the character, although it did not work so well due to the characters various animations and the angle when he is moving left/right or jumping. Overall I am glad that I experimented with this and got the results I was looking for.

Thursday 25 April 2013

Honours Project Podcast: Destony or Destiny?

This is a podcast explaining the strange spelling of Destony, maybe I should have called it DesTony as the name of the game was inspired by a friend of mine. I also talk about the inspirations I had for each level that is designed. To find out more, listen to the podcast bellow:

Podcast: Destony or Destiny?


Wednesday 24 April 2013

Honours Project: Learning Contract


Learning Contract

Module Code: AG1084A
Module Title: Honours Project

Student Name: Ritatsu Thomas

Student Number: 0800111
Telephone Number: **********
Email Address: ***********@gmail.com


Project Title: Game Aesthetics: Systemic and Visual Significance


Project Aim:

This project seeks to unravel the aesthetic experience of game players, but more specifically to evaluate and consider what impact systemic significance (gameplay design) and visual significance (art design) have within aesthetics. As the main researcher and implementer of this project, my personal aim is to be self-driven in seeing that the project will be completed to its highest degree taking in regards the objectives and major tasks.  


Objectives:

1.    Establish a critical framework based on aesthetic experience through refining the views of what creates a satisfying experience focusing on systemic and visual significance.

2.    Analyse two games using the created critical framework as case studies which successfully explore systemic and visual significance.

3.    Develop a 2-D interactive prototype which encapsulates values and insights learnt from prior research in the two previous objectives.

4.    Critically evaluate the results of the interactive prototype using the created critical framework and summarise how results materialized in regards to the project aim.


Major Tasks:

·        Establish the appropriate research needed in order to form the correct framework through documenting academic, theoretic, media and industry opinion pertaining towards game aesthetics, followed by system and visual significance within games.
·        Record the research and development process of all the findings through a blog or sketchbook.
·        Extrapolate that research through developing a theory out of the consistent trends that convey successful system and visual significance to create a critical framework with no more than six attributes within in a graph/table format.
·        Produce a case study of two games, one which is thought to excel in successful aspects of systemic significance, and the other which is thought to excel in visual significance.
·        Create the art assets for the game: including characters, enemies, backgrounds, objects, logos.
·        Create a prototype of the game whilst incorporating aspects of the found research.
·        Create a simple and effective GUI for the game in order for the user to be able to start the game and to set the stage.
·        Create a minimum of 6,000 word dissertation document which will discuss and detail all the major findings of the project and evaluate the outcome.
·        Create presentations in order showcase a coherent display of the research.
·        Prepare the external display of the showcase by printing off relevant materials and prepping software.


Submission Deliverables:

  • Concept Development Log – Consisting of a blog/sketchbook
  • Pre-Production Portfolio - Consisting of a blog/sketchbook
  • Research Proposal
  • The Honours Project Portfolio – This consists of a framework and interactive game prototype
  • Dissertation – Digital and physical submission
  • Exposition
  • Progress Presentations
  • End of Year Presentation
  • Personal Development Portfolio - Consisting of a blog/sketchbook


Resources:

  • Unity3D 4.0
  • Adobe Photoshop
  • Adobe Illustrator
  • Adobe Flash
  • Adobe Premier
  • Microsoft Word
  • Computers with relevant software
  • Meeting space 


Tuesday 23 April 2013

Main Menus: An Overlooked Essential

Why are Main Menu's so Important?
My Thoughts: When thinking of creating a game, creating the main menu is certainly something that you'd often let slip away of leave for the very last second. I feel that this method is flawed in many ways, why? because the main menu is one of the 'only' features in the game that they are indefinitely going to see every single the player plays your game. 

If you as an artist designed a side character and spent weeks modeling and texturing it so that it is highly polished, yet that character is inside an RPG or MMO, how often is that character going to be seen? chances are, that it is not going to be seen very often. The main menu on the other hand is seen every single time that player signs into his game or connects online. To leave something that is that often seen to be a last priority, I beg to differ that being a smart choice.

Experimenting with EZ GUI for Unity3D

Throughout today, to try and get the most out of the menus of my game, I followed through the bellow tutorial on EZGUI which is a Unity plugin that I downloaded to try out and experiment with as I had read some really good reviews on how it speeds system performance and keeps your whole interface in one scene as opposed to several and makes Menus 'EZ'.


Introduction to Unity and EZ GUI 1/5 from Johan S on Vimeo.

I followed all 5 sections of the video which took quite a few hours to comprehend and setting up EZ gui was not the simple and 'EZ' dream I had hoped it to be.

Using the software turned out to be fairly straight forward in understanding although the way of actually implementing it was a multiple step method which was a hassle to remember. You basically have to set up different objects with different backgrounds and EZ gui will  automatically pull and push those backgrounds with buttons on them to the front show the interface you would like to see, so it just swapped backgrounds so that all the interfaces can be on one spot which is great.

 Here was me trying it out and moving the backgrounds back and forth.

I started to create the buttons and assign the correct properties for them to launch new levels. You can also mess around with effects such as fade in or fade out or to make the button bounce or scale bigger or smaller when you press them which is great.

 Although at the end of my experience with using EZ GUI I realized that it really was a bit unnecessarily complex for my needs and decided it would be far 'easier' (ironically) and quicker to just stick to Unity GUI textures and coding button down functions with scene changes instead.


Sticking with Unity GUI Textures and Text

So in the end, I opted for a more simple method of using very clean and straight forward text with a minimal background to present my game. I played around with a really minimal background and a new type of font and by serendipity, I felt it really worked well and presented adequately the effect I was going for within my game. You can see an example bellow of the more final stages of my menu development. 

 Mega Button JavaScript Code: After searching the Unity Wiki and watching several youtube video tutorials on GUI, I managed to compile a master code which I used for every button feature of my game.


Button Normal: This is the interface of the script, as you can see there is a Normal, Hover and Pressed Texture, as well as Sound hover and Beep (which you add your own sounds to), then a message function which I did not need to use, then at the bottom is the Scene Name and Index which is where pressing the button will take you to a different scene. This button was incredibly helpful.

Button Normal: The GUI texture of the button when it is normal.

Button Hover: The GUI texture of the button when it is hovered over, the sound hover audio file also plays here.

Button Pressed: The GUI texture of the button when it is pressed down, the sound bleep audio file is also played here and the game takes you to your specified next scene.

Main Menu: This is what I ended up with in the end, Pros: it is simple and clean as well as focuses on it's purpose. Very functional yet also sophisticated. Cons: could possibly do with more features or some effects in the background, or even images of the game with the character.  

Saturday 20 April 2013

Supervisor Meeting: Dissertation Draft Feedback

I had another meeting with my supervisor, this one was helpful in more ways than one and the whole session was pretty much about my dissertation. I handed in my 1st draft a few days before and my supervisor Dayna spent a decent amount of time meticulously correcting and suggesting ways of improvement within my dissertation and it was all marked with a red pen to make things clear and easy for me to correct.

Again Noticed Skill Gap

The main things that needed improvement after the feedback 'again' was my use of hyperbole, which I have personally recognized as a skill gap within my writing. I tend to get quite excited with passionate words which at times have little or no evidence of truth. This is something i would like to improve with through the rest of the semester as it has been something that my lecturer also mentioned in regards to marking my previous blog and I have improved since then, but there is always room for improvement.

Here is what was discussed during the meeting along with action steps for the future:

Meeting Agenda:

·        Dissertation draft corrections and feedback.
·        Getting ready for the showcase: printing business cards and preparing work.
·        Critical framework placement in Dissertation.
·        Planning the next meeting after Easter break.


Progress Report:

·        The Dissertation draft was completed early in order maximise feedback and create a further polished academic piece of writing.
·        The case studies were both inserted into the dissertation.
·        The bug of collecting the light box within the game has been fixed and you can now collect the item at all angled rather than just the bottom.


Agreed action points:

·        Have a 2nd draft completed by the end of Dayna’s Easter Break.
·        Remove the extreme uses of hyperbole within the dissertation.
·        Try and cut down on the word count as 13,500 words is quite exhaustive for an art based dissertation despite it being an interesting read.
·        Restructure the placement of your titles.
·        Start getting your work ready for submission, leave the dissertation alone for a while and work on developing the game further.

Tuesday 16 April 2013

Honours Project Podcast: Why he was 'Alone' (TWA)

Another podcast, just like last time I reviewed the popular Iphone game Tings, this time I take a look at the popular minimalist platformer Thomas was alone and briefly explain what is the situation with Thomas, listen bellow:

Podcast: Why he was 'Alone' (TWA)


Thursday 11 April 2013

My Exhibiton Plan

The Original Plan

The original plan for my showcase is bellow. From the start, I wanted my character to pop out of the side, although had no idea of how to go about doing it nor did I know it was possible for printing companies out there to print your work straight onto a foam board. this is exactly what I need in order to create the 3D effect that I am going for and I am happy that I thought about this way early on within the project.

The plan was basically to have a large A2 poster to promote the game, as well as having 6 images of the game itself. Then a personal statement and business cards as well as a sketchbook. Then a card print out of the character was going to pop out from the side so that the showcase holds some originality as well as interest. 

Pros:

  • There is a lot of content and a large breadth of work on display.
  • It is simple and if set up right will give a polished and minimal look.
  • The pop out character is a large point of interest.

Cons:

  • The character may stick out too much and block the way of the public.
  • Two stands may be obstructive for the users. 
  • 6 images of gameplay and no production work is not ideal. 
This plan will surely change and be updated in the future, although it is always good to be reassured that you have a rough plan of future endeavors. 

Sunday 7 April 2013

Honours Project Podcast: Big Tiny Wings

It's that time again, a podcast of my thoughts, this time on the popular IOS game Tiny Wings which was launched back in 2011 with much success. I talk about the good and the bad of what my generally feeling of the game is in terms of it's aesthetic appeal. Listen bellow:

Podcast: Big Tiny Wings


Saturday 6 April 2013

Unity3D Destony Development + Inspiration

Design Concept

The original idea of collecting falling objects actually came from Totem Destroyer, which is a game in which you have to remove certain blocks by left clicking to help the trophy land safely. This inspired the concept of my game although I wanted to create more freedom with a platformer game and a concept of saving a fragile sense of positivism.


As you can see the concept is really similar, here is a small description of the game and you can also play it trough the link bellow:

http://armorgames.com/play/1871/totem-destroyer

Totem Destroyer is a physics-based block elimination game, where players must attempt to remove a certain number of blocks in each stage to progress. Blocks can be destroyed by left-clicking on them, and the level quota is always displayed on the upper right side of the screen. You will have to start all over if the golden idol touches the ground at any time.
Name: Totem Destroyer
Developer: Gabriel Ochsenhofer
Category: Puzzle
Type: Browser

Progress Report

Finally, the game actually runs. Here is a short video showing the development of the game as it currently stands. This is the first time that I have actually gotten to the stage of the game running to a decent standard so I am actually really excited to have reached this stage although there is still much more work to be done.


My Thoughts

The progress of the game so far is at a level in which I am happy about and a level in which the game could be showcased right now and I feel as an artist programming alone, this would be of some achievement to be proud of. The character jumps and the blocks have psychics which work and the overall game have a very polished look to it comparing it with my first ever flash prototype which just did not have the same level of polish.


Pros:

  • The character has been optimized to feel systemically good when playing with.
  • The visuals have been polished and look quite unique.
  • The gameplay is bare-bones yet of a decent standard and is very playable.
  • The walk animation suits the character well and is not choppy or too fast or slow.
  • The background is not too strong and brings out the game assets very well.

Cons:

  • The character has limited animations and could be improved with more tweaking.
  • The dark boxes have no animations and are somewhat plain.
  • The environment is very static and could do with a parallax effect or some other effects.
  • The game only has 1 level and it could bring a lot more variety if there were further levels in the game/
  • The music does not fully suit the atmosphere of the game and is somewhat too fast passed and lacks emotion.  

Possible Improvements:

  • It is certainly early stages and a proud milestone, although there are many improvements that need to be made, such as the character jump animation, the blocks being more animated, sound effects and music to be implemented and improved as well as more levels and a main menu and opening and ending sequence. 

Thursday 4 April 2013

Thomas is not Alone


Thomas was Alone, but now he has company as many admire the game and speak of it's great use of narration, simple albeit strong game design and a generally a successful atmospheric game. Thomas was alone has probably been the biggest inspiration for me in starting this project.

Mike Bithell explaining his game at the London unity User Group 6 (LUUG 6):
http://video.unity3d.com/video/3605775/luug-6-thomas-was-alone


Mike Bithells blog during his development which holds a lot of useful as well as inspiring information which is all relevant considering that he produced the game alone and was using Unity.

The blog can be seen here: http://thomaswasalone.wordpress.com/page/2/


Bellow is a video from his blog which shows his development as he starts to built up the game.